PASADENA, CA, 30 July 2021 – So, you want to be a home baker? The journey will last a lifetime, so it’s important that you begin by understanding the most important ingredients you are introducing to your in-home artisan bakery! Among them would be your preferred yeast; as a home baker, the choice between active dry yeast and instant dry yeast (also known as “rapid rising yeast,” “fast acting yeast,” or “fast rising yeast”) is vital, and requires some careful reflection. Their purpose is the same – for the most part, to make your dough rise consistently and reliably – though they are used and handled quite differently. Nevertheless, they are very much alike.
To help us get a good grasp of what’s going on here with active dry yeast and instant dry yeast (again, instant dry yeast, or IDY, is also known as “fast rising yeast”), we spoke with our technical applications manager here at Bellarise®, Michael Heimink. To our discussion he brings over 40 years of experience as both an expert helping the world’s largest and greatest bakeries fine tune their recipes, and as an award-winning artisan baker on the retail side. All the while, his characteristic Long Island accent easily brings all of these concepts to life!
“I’ve worked with cream yeast, compressed or fresh yeast, ADY, and IDY, and pretty much all forms of baker’s yeast. When I got started in the 1980s, most of the retail shops I worked with used fresh yeast, and there were a few that used ADY,” says Heimink of his experience with baker’s yeast. All of these yeasts can’t all be the same, though, right?
“Like anything else, all yeast types have their advantages or disadvantages. The big differences are mostly how they’re handled and how they perform throughout their shelf life. In the case of ADY and IDY, they are made into ‘short noodles,’ which are short granules that we typically see in vacuum-sealed packages. That’s different from cream yeast and compressed block yeast, which is also known as crumbled yeast,” adds Heimink about the physical differences. Each form, though, has a different shelf life, and that weighs heavily on how home bakers, retail bakers, and industrial bakeries alike produce their breads. “Shelf life and consistent performance are the key.” Both ADY and IDY have a longer shelf life than other yeasts, resulting in more consistent bread quality bake after bake, since each and every yeast variant’s gassing power, from cream yeast to IDY, declines throughout its shelf life. The longer the shelf life, the more consistent the gassing power is over time. Both active dry yeast and instant dry yeast give you the longest shelf life of any baker’s yeast.
Though ubiquitous in grocery stores across America, we take for granted the origins of dehydrated yeasts like active dry yeast, as they go back to the age of black-and-white newsreels. “Before World War II, active dry yeast was produced to satisfy a need for yeast to be shipped long distances and stored under variable conditions, while remaining stable or viable. Fresh yeast is unstable, so yeast was dehydrated and processed differently, and active dry yeast became the first iteration or evolution of yeast that took on a dehydrated, granular form.”

Ah, that feeling when you’re about to bite into your own fresh, home-baked bread!
So, in use, what are some key differences between ADY and IDY? Heimink says that it’s all about the handling. “So, active dry yeast needs to be incorporated into a mix of water heated to a temperature of 105-110 degrees Fahrenheit. You take the yeast and add the hot water to it and stir it, let it sit for several minutes to activate the yeast, and then add it to your formula or recipe.” He then explains an essential difference between ADY and instant dry yeast (again, otherwise known as IDY or fast rising yeast) that you must always observe when baking at home, or anywhere, for that matter. “The benefit to IDY is that you bypass that step. You just add IDY to your dry mix. There’s no need to pre-mix the yeast with hot water, and it should never be done.” If you pre-mix your IDY with hot water like you would with ADY, your dough may not rise as expected and result in a bread that you didn’t expect.
Pre-mixing ADY with water requires careful attention to detail, and IDY removes this important step and simplifies your home baking process. With instant dry yeast, you don’t have to heat water to 105-110 degrees Fahrenheit and create a slurry separately, as you would with active dry yeast. That’s a tight margin of error when you already have so much to do while baking, and being outside of that temperature range for ADY may affect your dough’s ability to rise. “Variations in water temperature can impact your overall fermentation times,” emphasizes Heimink. Instead, IDY (again, also known as “rapid rise yeast”) allows you to eliminate this part and get on with mixing.
“Instant dry yeast completely kicked that aside and said, ‘You know what? You don’t need to do that anymore.’ Now, you can just add IDY straight to the mix and go on your way,” so it makes baking bread at any level so much easier. Paying attention to temperature is essential regardless of the type of yeast you use; nevertheless, with IDY, or rapid rise yeast, you don’t need to make a slurry prior to mixing it with your dry ingredients, and it becomes active in your dough once it’s warmed up during the mixing process.
Indeed, active dry yeast was a huge evolution in the yeast business because both ADY and IDY could be stored for a much longer time than other yeasts that preceded it. “With fresh yeast, for example, after 14 to 21 days, you’re getting massive degradation in gassing power. With active dry yeast and instant dry yeast, you have many months, if not years, of shelf life,” states Heimink. If you have left over yeast, place it in an airtight container in your fridge and use it within the next two to three days for best results. In the event that you use your freezer instead, make sure to quickly take out and thaw the amount of yeast you need. With the freezer option, you would also need to place the airtight container of unused yeast back in the freezer as soon as possible.
Prior to beginning your bake, proofing your dough is vital. “Going with 100 degrees Fahrenheit is pretty standard in the baking industry, depending on what you’re making. It’s a sweet spot, and with good relative moisture, it makes the yeast ferment even better.” Regardless of the yeast you use, this sweet spot applies across the board, in most cases. When possible, make sure to take your dough’s temperature after mixing. Keep in mind that baking on a sweltering mid-summer afternoon or a frigid mid-winter morning can make controlling your dough temps a more involved process. Ideal proof times, on the other hand, may vary depending on what you’re baking. Of course, following your recipe to the letter is essential.
So, these days, instant dry yeast (aka fast-rising yeast, rapid rise yeast, IDY, etc.) and active dry yeast give home artisan bakers so much leeway in their process, and yield outstanding results when used correctly. There is more certainty when it comes to shelf life, both forms of yeast are easier to use at home than any other, and their performance is more predictable than other yeasts. Your bread recipe will be your road map, and your baking process (which should also account for your ambient conditions, such as relative humidity and overall ambient temperature) will be your guiding light as you embark on your home baking adventure. Bring enough yeast sachets and yeast packets with you because you’ll be baking so many different breads along the way. Enjoy every step and every bake, because they are all learning experiences no matter how long you’ve walked the path of the artisan home baker!
Part of our commitment to providing the baking industry with unparalleled baking ingredients, such as Bellarise® Yeast, is being ready to help bakeries across North America bake the best clean label, Non-GMO, and organic breads in the world. Contact us and let our Product Development Department know about your bakery’s clean label goals and challenges. We would gladly partner with you to find the right solutions and support your bakery’s efforts to craft the very best clean label breads in the market.
P.s, Here’s a recipe straight from our Bellarise® Baketech Innovation Center for a classic pan bread you can bake at home! Whether you use the metric system or the standard US system, this recipe is easy to follow and makes for some good bread eatin’. Enjoy!
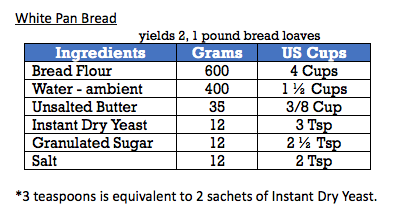
- Mix flour with instant dry yeast (also known as rapid rise yeast, or IDY) in a mixing bowl.
- Add sugar, salt, and water and mix until a dough is formed.
- Add unsalted butter and continue to mix until the dough is well developed.
- Leave dough in mixing bowl and cover with a damp cloth (towel).
- Let rise to dough in size (1 hour).
- Remove dough from bowl and place on lightly flour dusted countertop.
- Divide dough into two even pieces, and round into dough balls.
- Cover and let rest for an additional 10 minutes.
- Flatten the dough pieces and roll into logs.
- Place into greased loaf pans and cover once again.
- Let rest until doubled in size, and dough springs back when touched.
- Place in a preheated oven at 350°F, and bake for 35-45 minutes, or until golden brown.
- Let sit in the pans for 10 minutes before removing and placing on cooling screens.
- Slice and enjoy.